As of March 2022, you no longer need to buy Adobe licenses. The Adobe Creative products are now available to all DOE staff and students for free!
An accessible PDF is the foundation used to create an accessible fillable form. There are multiple ways to create an accessible PDF. In all cases it is a multi-step process.
Adobe Documentation and Webinars
You use Adobe's documentation and webinars to gain a better understanding of the process. These include:
- Using the Acrobat Pro/DC Accessibility Checker
- Set the document’s language
- Add a Document Title
- Add tags to the PDF file
- Add Alternative Text
- Watch any number of Adobe Recorded Webinars and Practice Files
- These webinars and materials are provided by Adobe.
- Currently, there are six videos.
- Adobe is adding to this collection over time, so check often for new content.
- To access a video, click on the circle with the internal arrow
- this will run the video on the left side/center of the screen.
Make an Accessible PDF
As stated above there are multiple ways to create an accessible PDF. It is always best to start with simple until you are able to build up experience and expertise. And don’t forget to attach the Accessibility Report to the PDF before submitting it to the webteam.
If you have the original source document verify the accessibility before you create the PDF in Adobe Acrobat Pro/DC:
- If the document was created in Microsoft Word, PowerPoint or Excel.
- Run the accessibility checker on the original. content.
- The checker can be found at: Review > Check Accessibility > Check Accessibility.
- Resolve any Issues found in the check.
- Save your clean document.
- Turn the Word, Excel or PowerPoint document into a PDF.
- The last tab to the left of "Help" will be "Acrobat."
- Click on Acrobat and then select “Create PDF”.
- The source program will generate the PDF and it should open in Adobe Acrobat.
- Save the PDF.
- If it doesn't auto-launch Adobe Acrobat, launch Adobe Acrobat Pro/DC and then use it to open the PDF.
Run Adobe's Accessibility Checker on the PDF
- Once you are in Adobe Acrobat Pro/DC, open (or add) the Accessibility checker to your version by going to the "Tools" tab.

- Scroll down to the "Protect and Standardized" section to find the "Accessibility" tools.
- You should be able to open it by double-clicking on the icon.
- If you can't, click on "Add" in the drop-down box under the icon.

- This will permanently add the Accessibility tools to the right-hand rail within your version of Adobe Acrobat Pro/DC.

- Select it and then select "Accessibility Check."

- Make sure to check the box labeled "Attach report to document."
- NOTE: you'll need to have the attached report in order to have your PDF posted on any of our websites.

- Resolve all accessibility issues identified in the check.
- Save your PDF file every time you fix something.
- Once your PDF is fully accessible, re-run the accessibility check and be sure to save the report one last time.
- That way, the most current version of the Accessibility report will show that your PDF is accessible.
- Submitting a report that shows accessibility errors, warnings, and/or issues will keep you from being able to post your PDF on our websites.
View the Accessibility Report
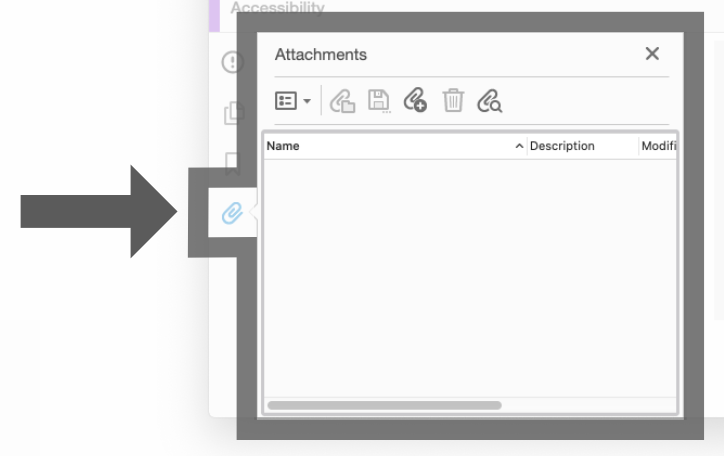
- Open the PDF in Adobe Acrobat Pro/DC on your device.
- Click on the paperclip in the left rail of the screen.

- This will open an additional column

- If there is an attached report, you will see it there.
- If there is no report it will be empty.
Make an Accessible Fillable Form
- Now that you have an Accessible PDF, save it again with a different name.
- Use the Adobe Tool “Prepare Form" wizard
- This wizard will automatically convert any fields the wizard thinks it finds in the form.
- Watch an Adobe-supplied video on how to create an accessible PDF.
- The "How to" section starts eight minutes in.
Tips
- Always keep the Accessibility Checker open on and rerun as necessary to guide you through the form creation process and correct accessibility issues along the way.
- As with all other types of PDF’s; forms must attach the successful Accessibility file to have your form added to a website.
PDF/Fillable Form Must Haves
- All PDF’s and forms must be accessible and must have an attached accessibility report testifying to that.
- Submitting a report that shows accessibility errors, warnings, and/or issues will keep you from being able to post your PDF on our websites.
- All Documents must have an Heading 1 tag
- There may only be one H1 tag per document.
- All subsequent headings/subhead tags must be in order.
- An H3 cannot directly follow a H1.
- It must be preceded by an H2.
- Font size matters.
- 12-point type is the recommended minimum for instructional text.
- All PDF’s must have a title manually added into the "Title" field.
- Alt-Text usually requires manual re-entry.
- Tables can be complex, so avoid them whenever possible.
- Reading order (or tab order) is very important in fill-able forms.
Troubleshooting Guides
- Common Adobe Accessibility Errors and How to Fix Them
- How to make an Accessible Excel File for a PDF
- How to make an Accessible Word File for a PDF
- How to make an Accessible PowerPoint for a PDF
- How to Convert a PDF to a Word Document and Create a Fillable Form
- Adobe Forms Advanced Topics and Helpful Video Links
- How to Verify and Move to Office 365 Subscription Products on all your DOE Devices
